

SUMMARY WHEELS AND BRAKES STAINLESS STEEL PARTS FRONT MUDGUARD LIGHTS AND ELECTRICS PAINT SEAT EXHAUST ENGINE AND GEARING INSTRUMENT CONSOLE AND TELEVISION WHAT'S IT LIKE TO DRIVE AND WHEELIE ISSUES FAX MACHINE WHERE HAS IT BEEN AND WHERE IS IT NOW? 2019 TO 2022 RESTORATION VIDEO SERIES YOUTUBE CHANNEL PROMOTION
THERE ARE LOADS OF PICS OF THE KX IN MY NEW KX GALLERY
AND THERE ARE 3D PICS OF THE KX IN MY 3D PHOTOS PAGE
THIS IS A PDF DOWNLOAD LINK FOR THE FRAMED INFO I HAVE NEXT TO THE BIKE AT SHOWS
It gives a condensed summary of the bike history and the 2019 to 2021 restoration/re-customisation.
TO DOWNLOAD: RIGHT CLICK THEN "SAVE LINK AS". TO OPEN: CLICK THE IMAGE WHICH ALSO HAS A DOWNLOAD LINK
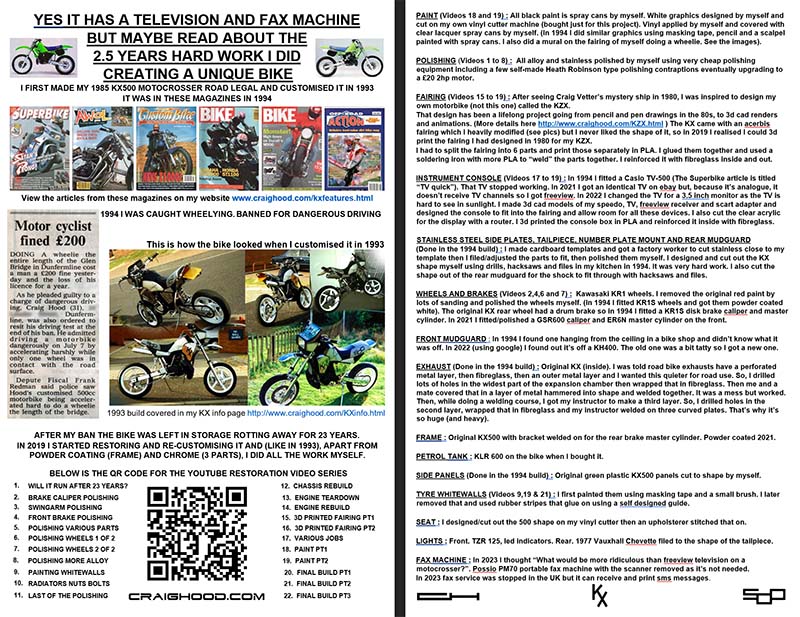
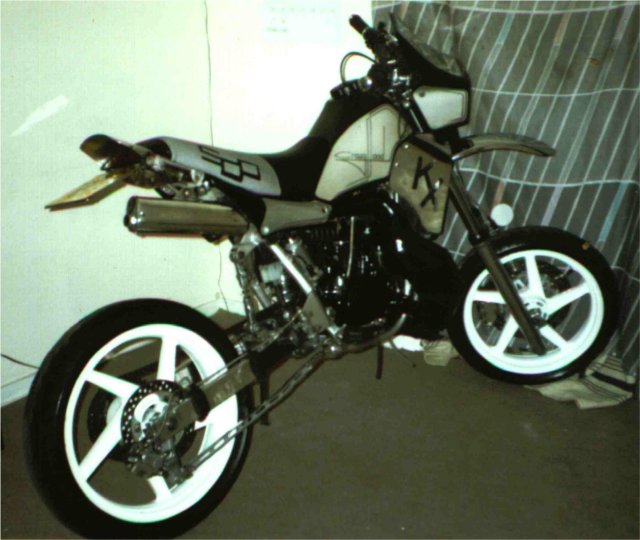
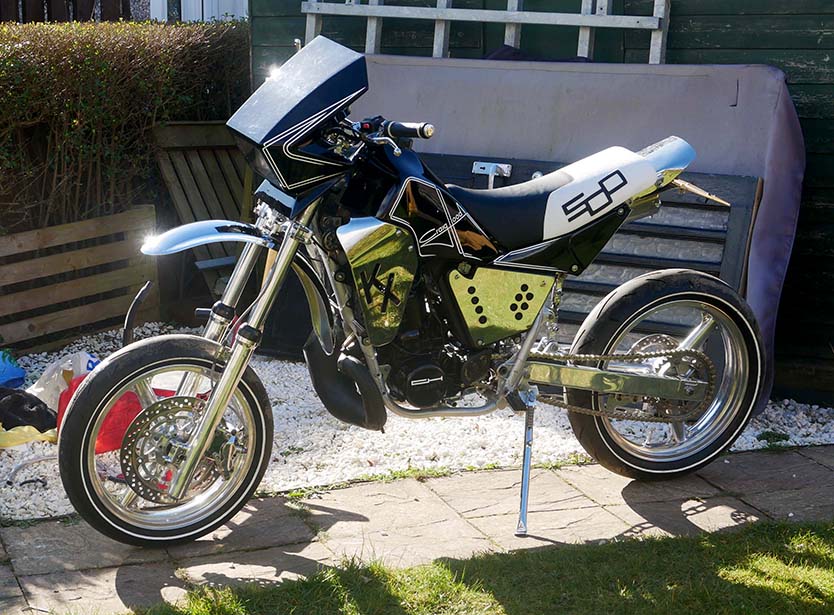
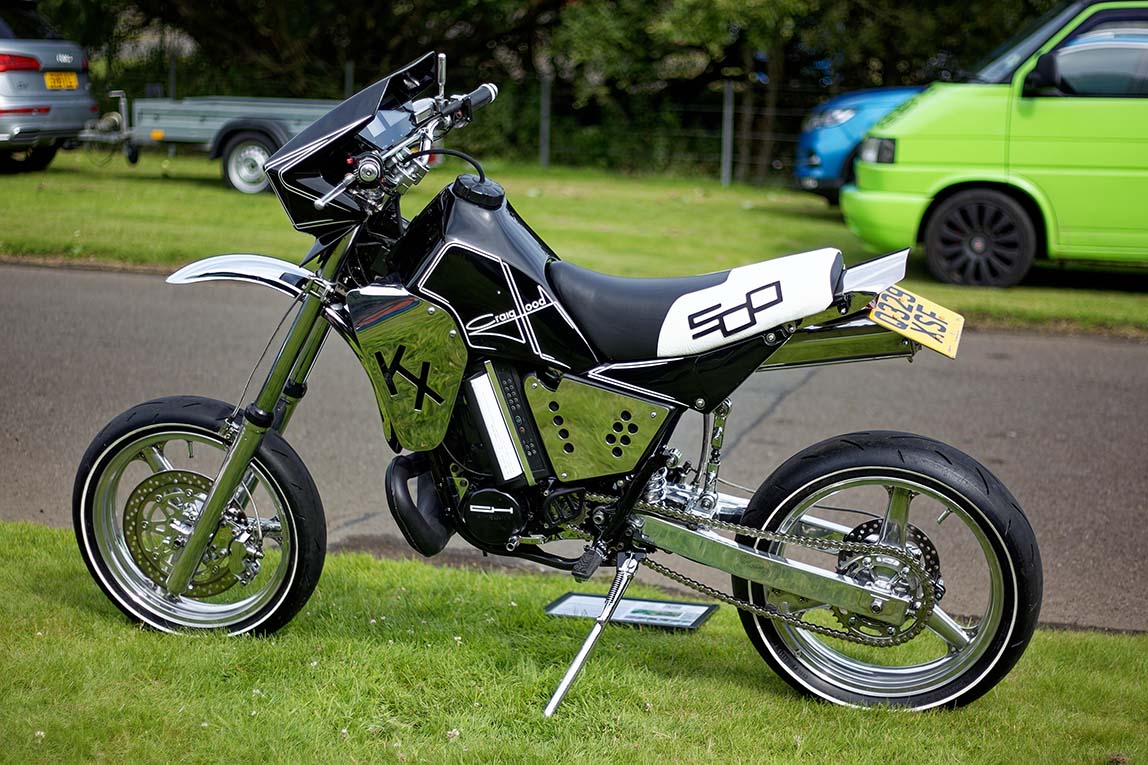
THE BIKE IS BASED AROUND A 1985 KAWASAKI KX500 B1 MOTOCROSSER
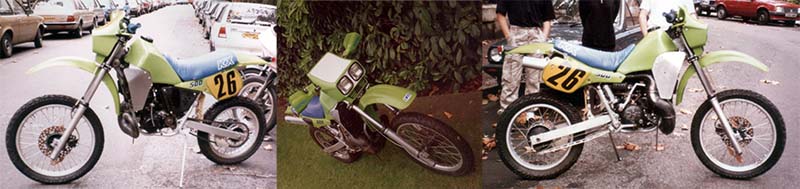
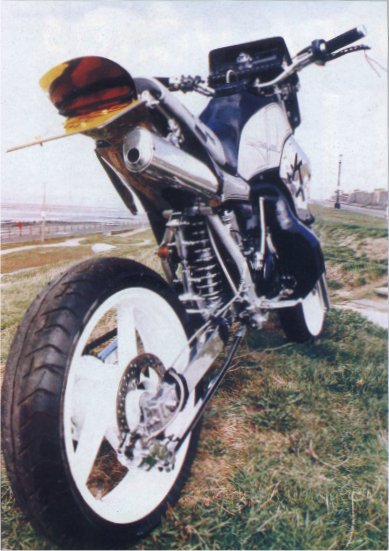
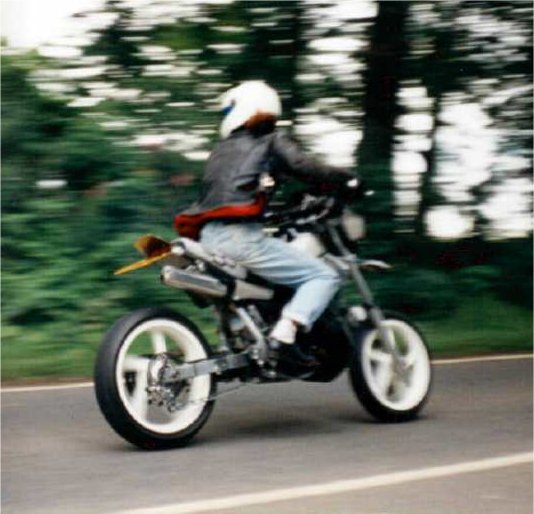
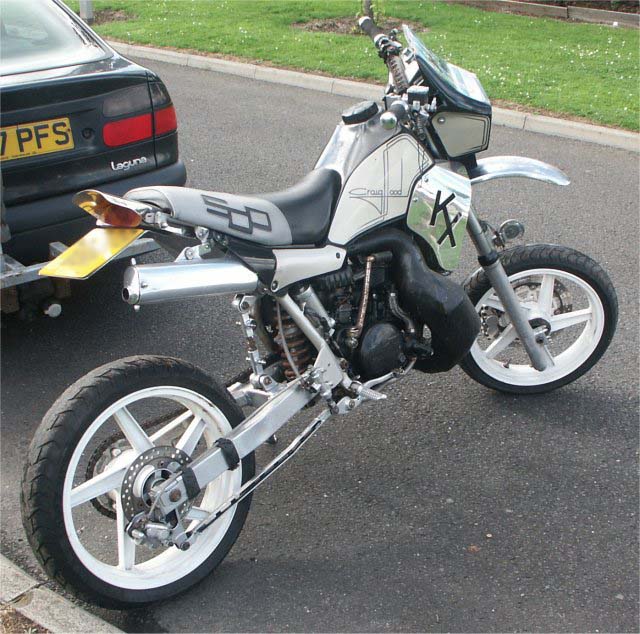
This is how it looked when I bought it around 1990.
I made it road legal on the 5th April 1993 and used it on the road for a while. For the MOT (UK roadworthy test) it only needed a plastic cover for the front sprocket and wiring up the lights which didn't work.
So it was still all green plastic as above, then in June I decided to customise it ready for the 1993 Kent bike show, which was on in four weeks time.
During the four weeks of building, on three occasions I worked right through the night (in my living room) without stopping for food or drink.
My goal was to make the bike good enough to be featured in a magazine, and to approach the magazine people at the Kent show.
At Kent quite a few people asked if I was putting in the show. I was a bit surprised by this, but very chuffed when the organisers accepted it.
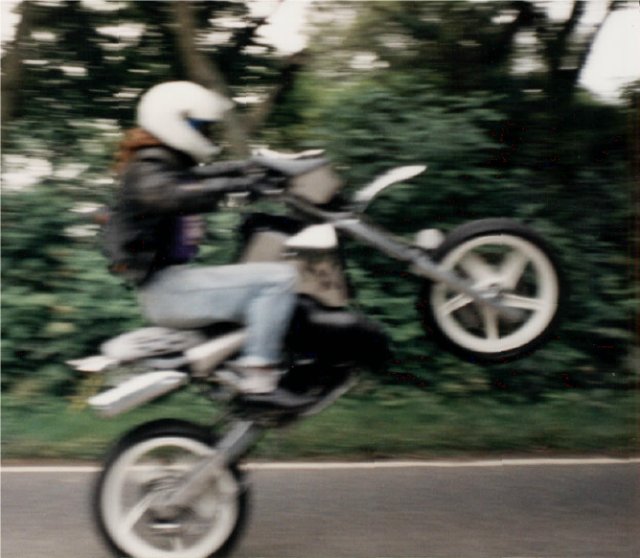
I set out to make the bike look good, different and also much more like a road bike, hence the indicators, road bike wheels e.t.c.
I didn't set out to build a supermoto, just a customised road bike. At the time of building it I had never seen a motocrosser with alloy wheels and thought it might look good.
I didn't have the internet at that time and didn't buy motorbike magazines.
I know there are loads of motocrossers about with alloy wheels now (or supermoto replicas), but at that time it was very rare.
Just before customising the bike mid 1993 at the scottish motorcycle show, I mentioned to a company that sold alloy wheels for bikes that I was thinking about putting alloy wheels on a motocrosser. The guy instantly said that it was impossible and definitely couldn't be done. (I spoke to quite a few people with a "you can't do that" attitude whilst building this bike. That just made me want to do it more).
I then walked to another alloy wheel stall opposite him and said the same thing, and the guy at this stall said "That's a great idea!". So, both of those companies who sold alloys for bikes had never heard of a motocrosser with alloys.
Paul Chiappa, the mechanic from Dunfermline motorcycles who has been very successful in motocross racing said I was the only person he knew of that put a motocrosser on the road.
I think the word customise means to make something unique, different and original. So the last thing on my mind was choosing a category and putting a colossal amount of time and work into producing something that fits perfectly into that category and looks exactly the same as every other bike parked next to it at shows.
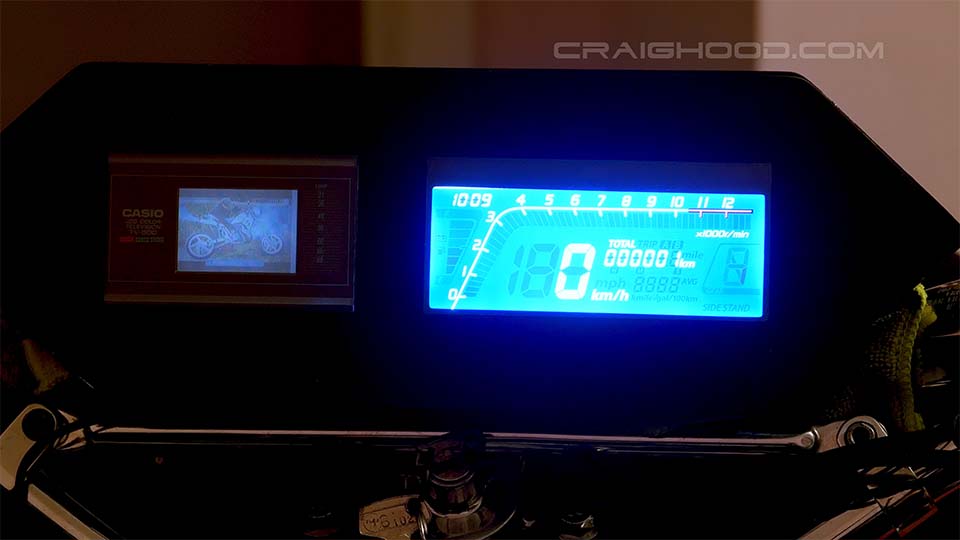
It has a 2 inch screen colour television where the speedo usually sits. I'd like to think that I'm the first person stupid enough to put a TV on a motorbike
(I would be interested to find out otherwise), but I must surely be the first person to watch top of the pops on a motocrosser.
Or maybe the first person to get points on their TV licence. More details below in the Television chapter.
2022 UPDATE
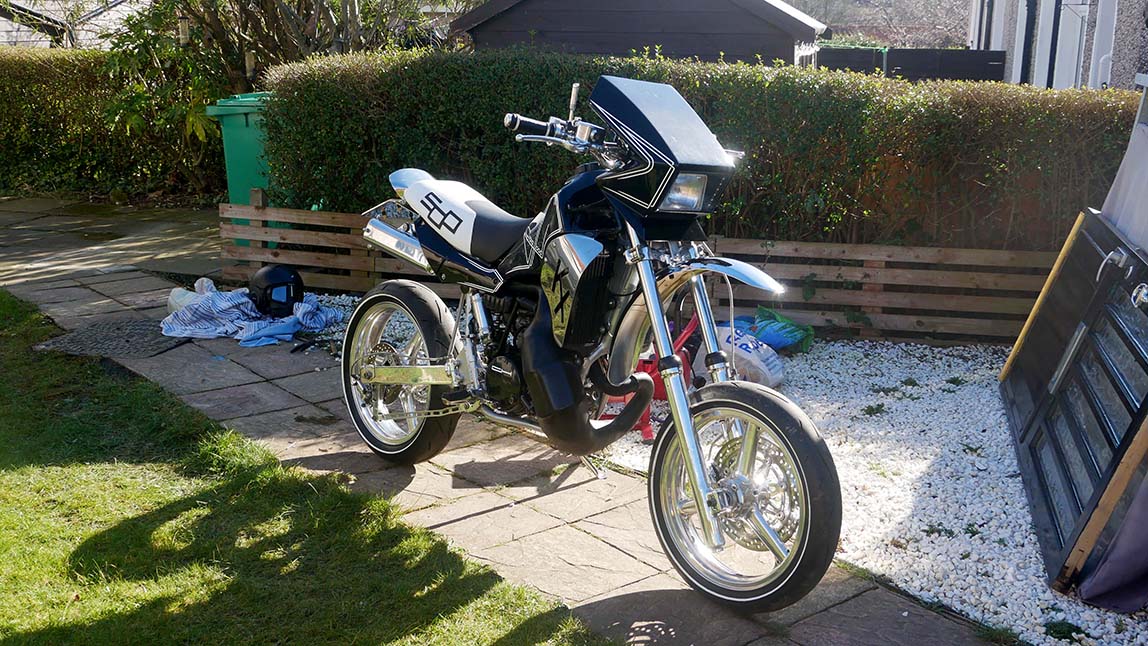
In November 2019 I got the urge to restore/re-customise the bike after it being stored in sheds and garages for 23 years.
The first customisation took mostly 4 weeks with some additions later like the mural, but this latest customisation was a colossal amount of hours over 2 years and, even though i still did as much as possible myself and did it as cheaply as possible, it cost a lot more money than I expected.
I finally got to the stage of building the finished parts together (painted, polished etc.) around the beginning of March 2022. So it took that long before I could see what it looks like.
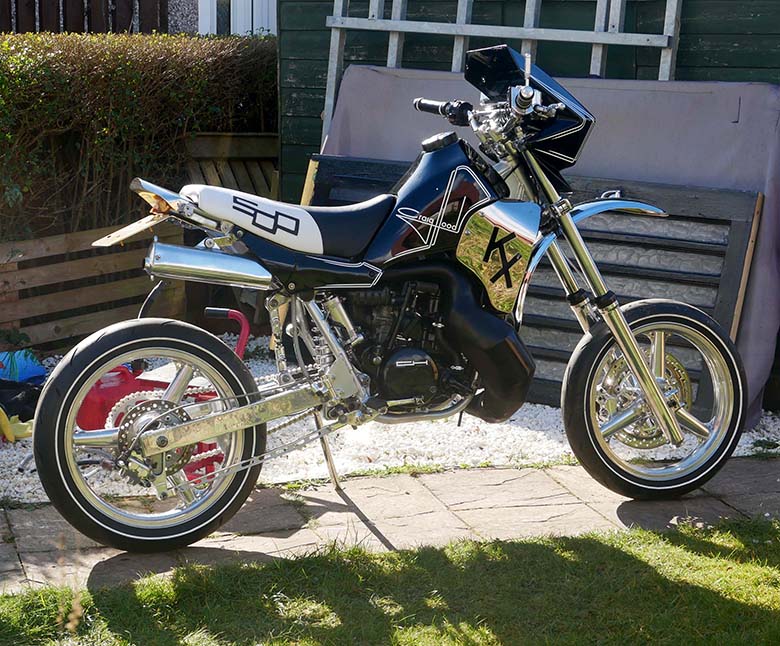
It was due to be in the Scottish motorcycle show 12/13th March 2022 in their custom bikes section . I found out it was accepted in January 2022 so that gave me a deadline and, even though I had worked on it massively in the past years, I then started working all day every day on it.
This time the whole process is covered in lots of detail in very high quality 4k video with captions giving all of the important details. See the 2020 RESTORATION VIDEO SERIES below for more details.
I will add details to each chapter in this page with a 2022 update underneath the original 1993 build paragraphs.
This update has the same 2 inch screen colour television but, because you can't receive analougue signals in the UK anymore, I had to add a freeview receiver and aerial.
More details below in the Television chapter.
WHEELS AND BRAKES
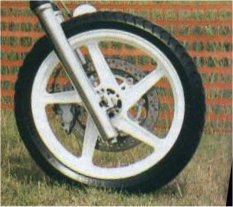
The wheels are from a Kawasaki KR1S. The front wheel just needed a small spacer made, but the rear sprocket needed to be moved inwards about 5mm.
I got a friend of a friend to do the machining on a lathe for 10 GBP, but as neither of us had done that kind of thing before, I had to make a drawing for him.
I decided on machining 2.5mm from the inside of the sprocket carrier and 2.5mm from the wheel. This took a fair bit of working out, what parts to machine.
If you're thinking of building your own street motocrosser I would suggest taking accurate measurements from different wheels before buying them.
Or buy ready made wheels from a supermoto specialist. The KR1S wheels were not a particularly good choice, it was all I could afford at the time.
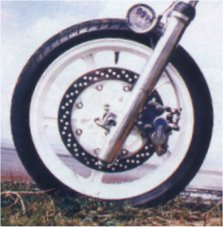
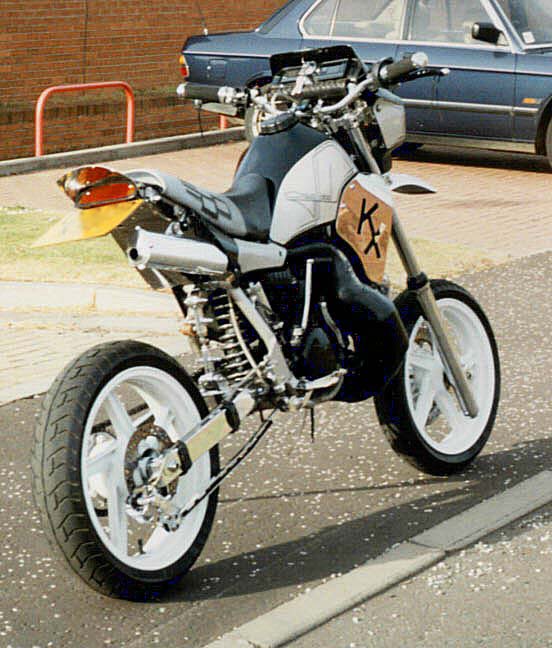
I had to make a spacer/mount for the front brake calliper (also KR1S). This was reasonably easy to do. At first for a while I used the original KX500 master cylinder.
I stripped the paint off it and polished it. This looked good and seemed to work very well until I got round to refurbishing the calliper.
It's a four-pot calliper and it turned out that only one pot was working, so when I freed up the other three it turned out that the KX master cylinder wasn't big enough to push all four pots.
Thanks to the Chiappa brothers at Dunfermline motorcycles for help with that problem. After that I used a master cylinder from a late 70s or early 80s Honda CB750F (I think), which doesn't look too good, but works ok.
The original KX rear wheel had a drum brake, so I had to slightly alter the rear calliper mounting bracket to fit in-between the wheel and the swinging arm.
I got big Roy Burke from Rosyth to weld on a mounting bracket for the rear master cylinder.

Roy has a lot of experience of building trikes, choppers, fabricating welding e.t.c., he was a great help and inspiration in building the bike.
He has the same very open mind as me when it comes to ideas and we had loads of good brainstorming talks about customising.
Roy also introduced me to stainless steel, which is maybe not such a good thing because it is an absolute nightmare to cut, file or polish.
It looks good polished though and will stay shiny unlike alloy. The stainless parts on the bike are as follows :
2022 UPDATE
Before buying the KR1S wheels for the 1993 build I originally bought a pair of three spoke alloys which was my preffered style, but I was ripped off as they were badly buckled. In 2020 I found out that KR1 wheels are almost identical and are three spoke so I got a pair for £80.
I had to remove the factory red paint by sanding with rough sandpaper then finer sandpaper, then rough polishing buffs then fine olishing buffs. This is all covered in detail in videos 6 and 7 of the restoration series.
I finally got to the stage of building the finished parts together (painted, polished etc.) around the beginning of March 2022. So it took that long before I could see what it looks like.
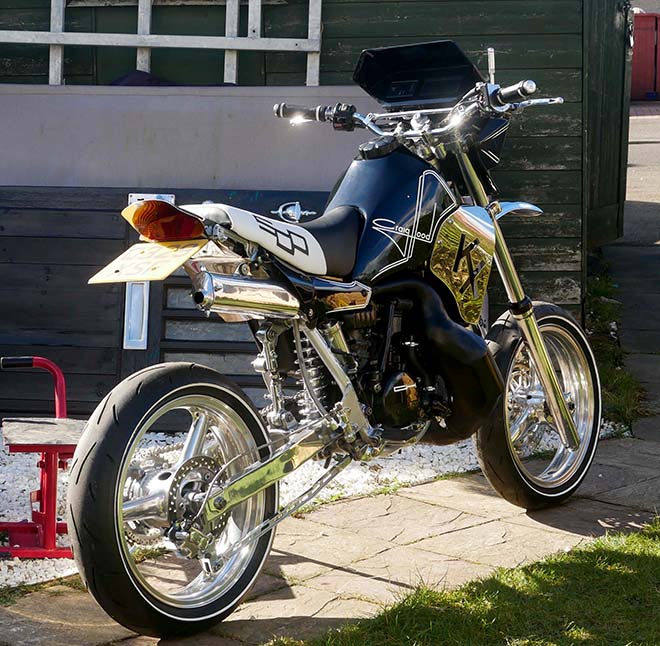
STAINLESS STEEL PARTS
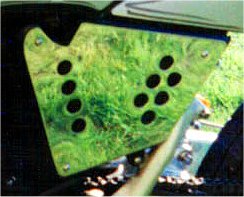
KX side plates : A mate who works in a stainless steel supplier/fabricator cut these to a template that I roughly copied from the original alloy side plates that were on the bike when I got it.
I designed the KX logo on paper then scribed the shape onto the metal and went about drilling the shape out. I must have lost about a stone in weight after 3 days of hard graft.
I went through about 6 drill bits as they just kept glowing red hot and wearing out. I have since learned that a proper upright drill with adjustable speed would cut through it no problem,
but I did almost all of the work on the bike with quite basic resources and not much cash. After drilling a few starter holes I then used a hacksaw with a round profiled blade
which can cut round corners to cut out most of the KX shape. Then finished it off with small round and flat files.
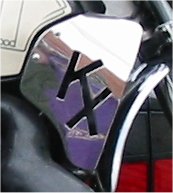
When the bike was in custom bike shows I would hang around when the judges were going round the bikes. I watched one judge looking closely at the side plates then shouting out
"They've been made with a punch". A few years after building the bike, I worked in a factory that had huge machines, which would punch holes of any shape effortlessly through sheet metal.
If I'd only known that at the time I would have told the guy about my 3 day nightmare. All of the stainless parts were hand formed by myself using metal that had a very rough finish.
So I had to start off with quite rough sandpaper (maybe 120) to get rid of deep scratches, then go down almost one grade at a time to slightly finer sandpaper to remove the scratches from the grade before.
After fine wet and dry (maybe 500 to 1200) , I moved onto a coarse polishing buff with coarse polishing compound, then to medium then fine. It took absolute ages to polish,
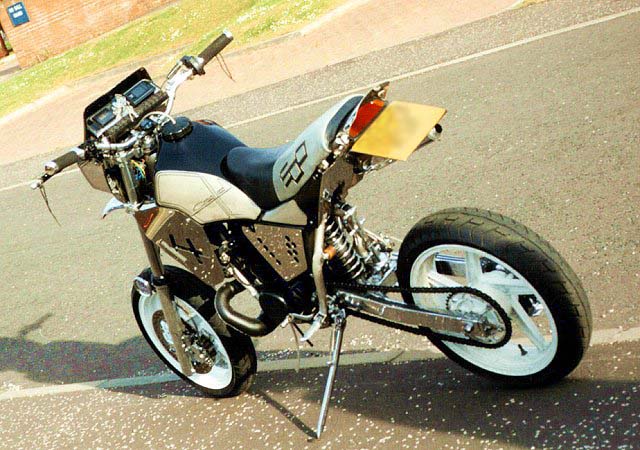
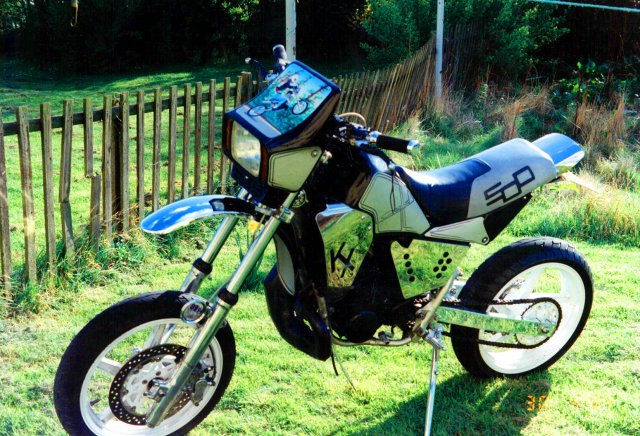
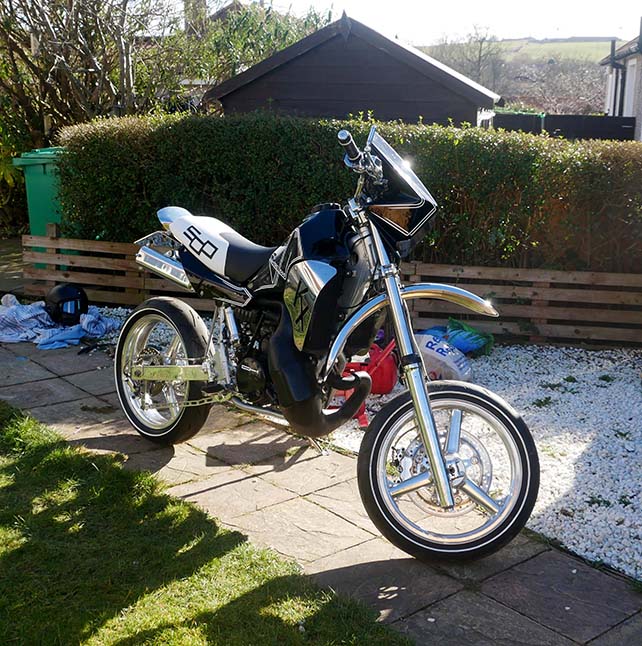
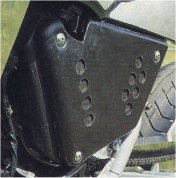
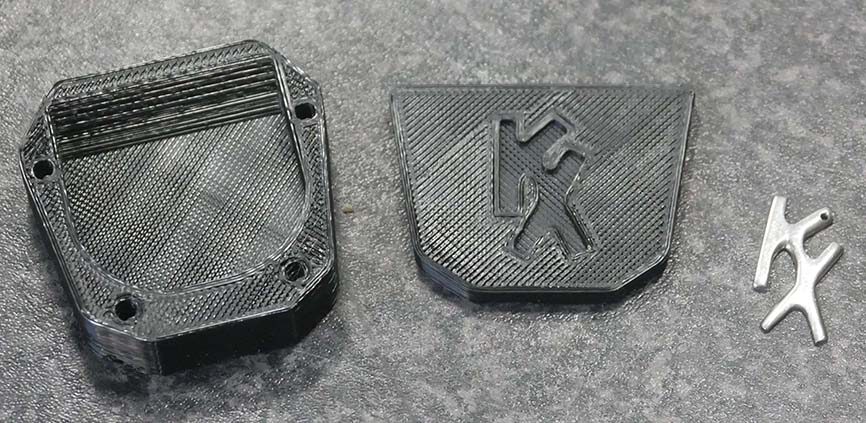
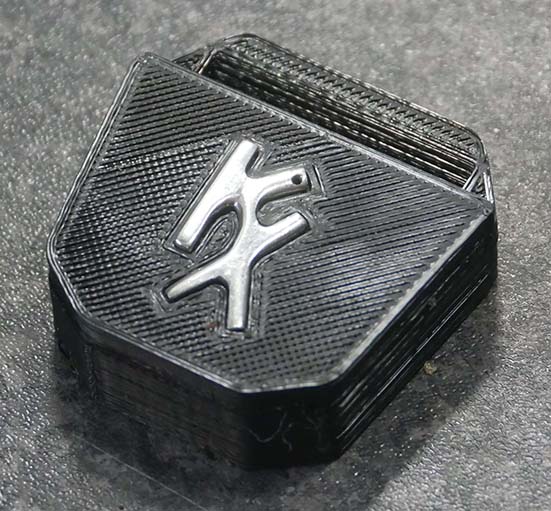
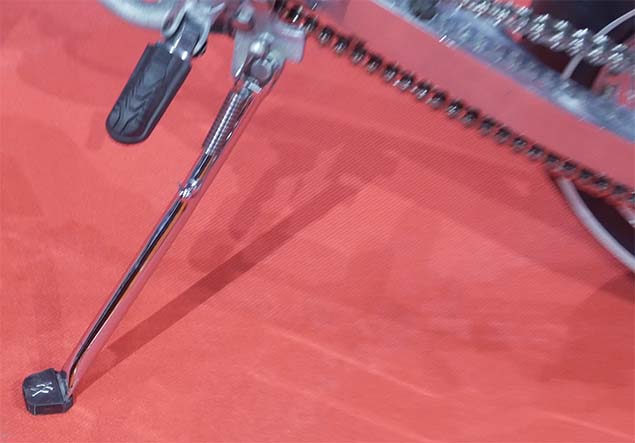
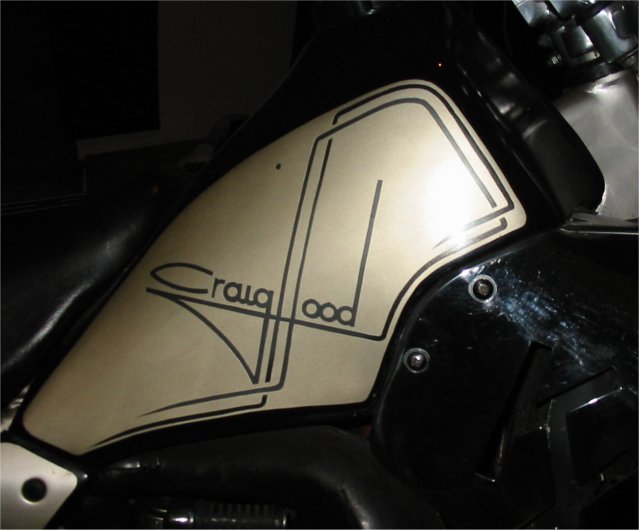
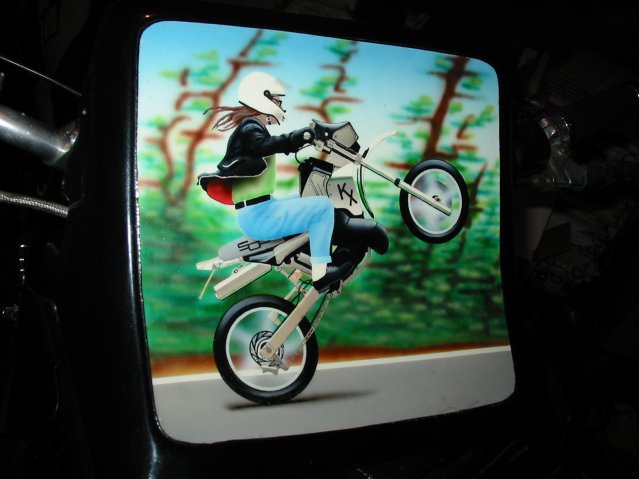
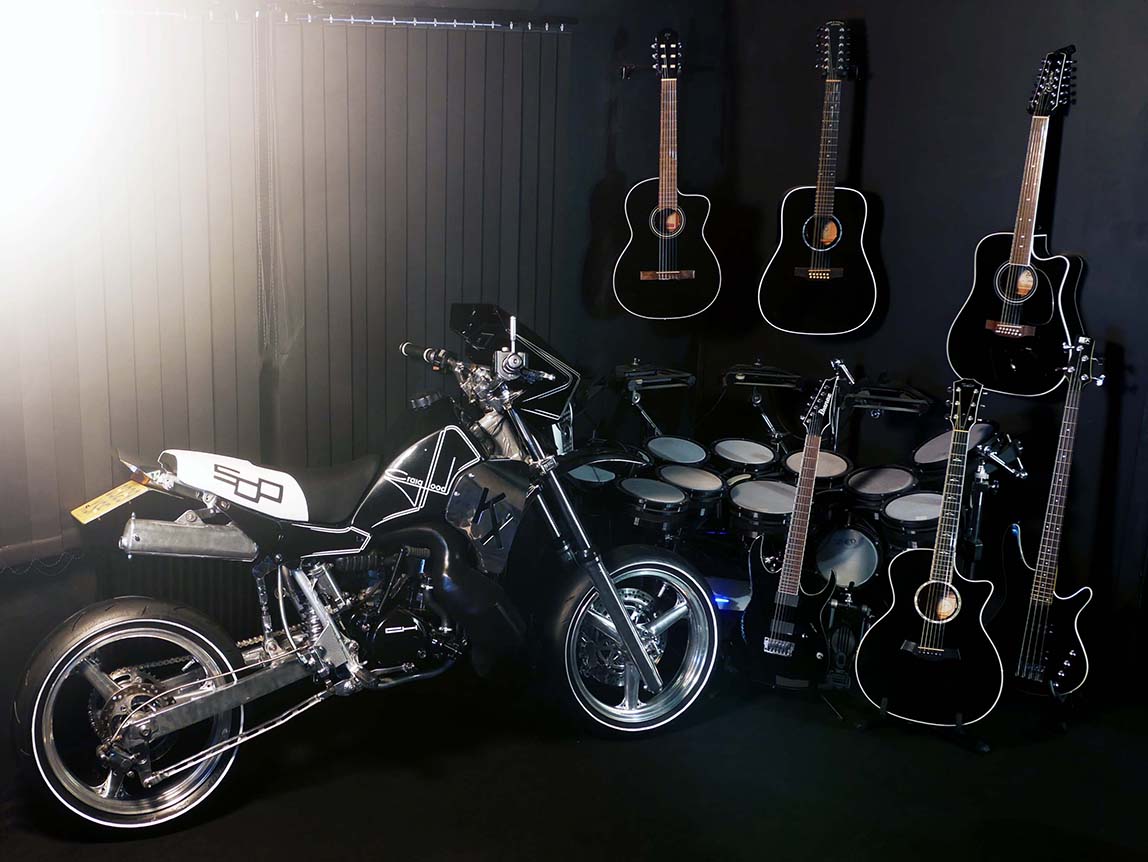
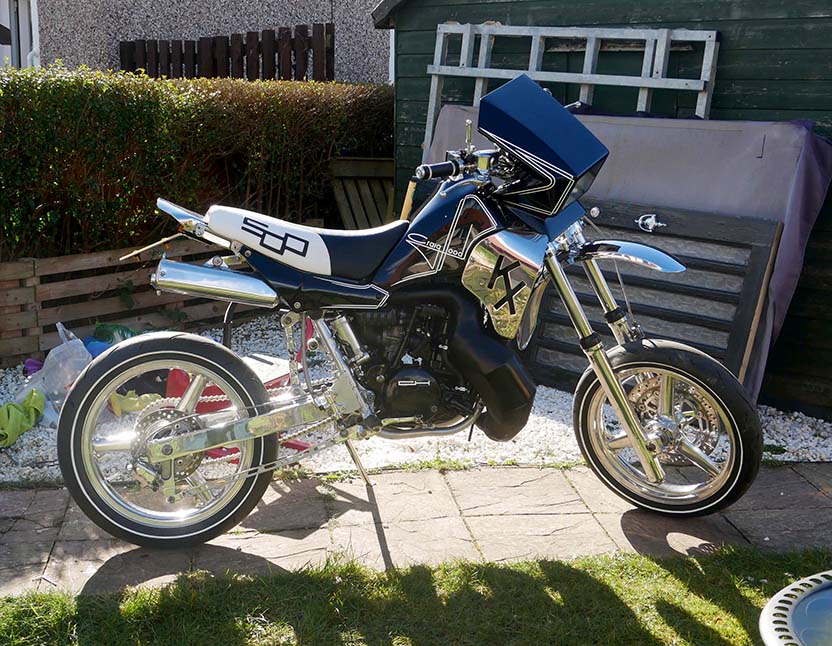
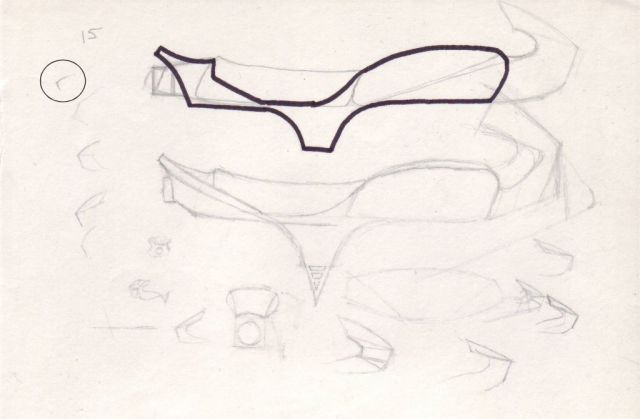
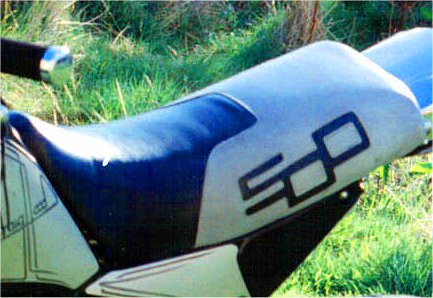
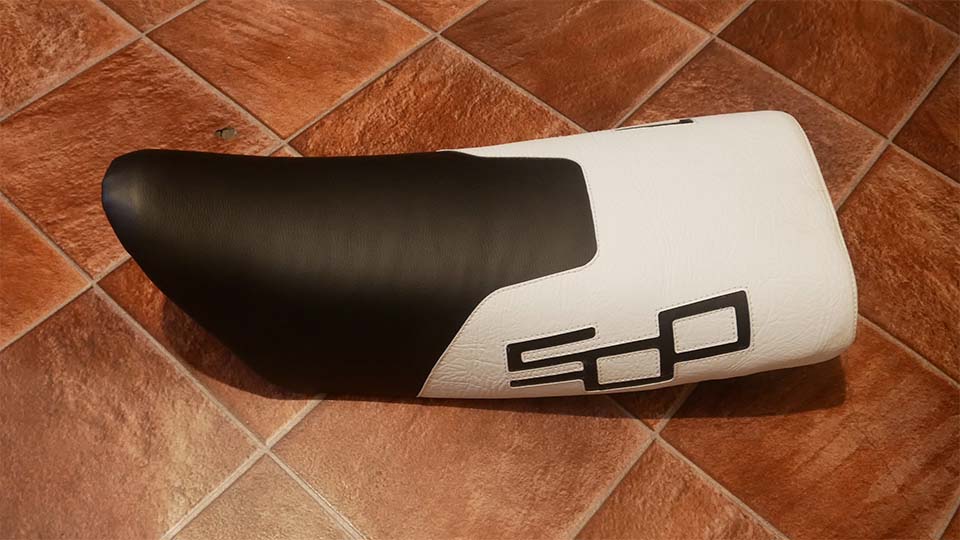
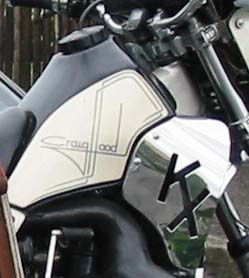
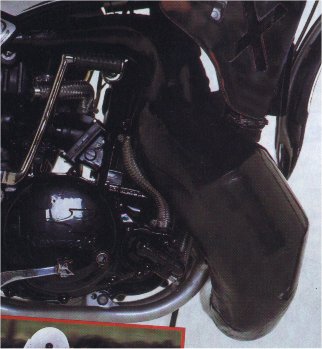
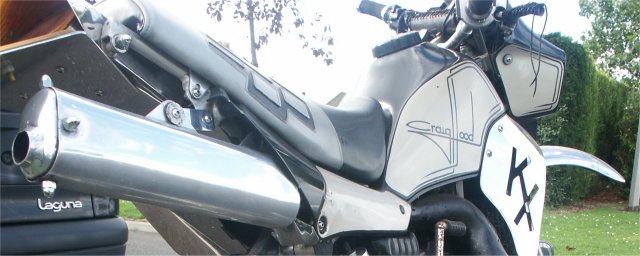
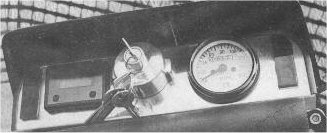
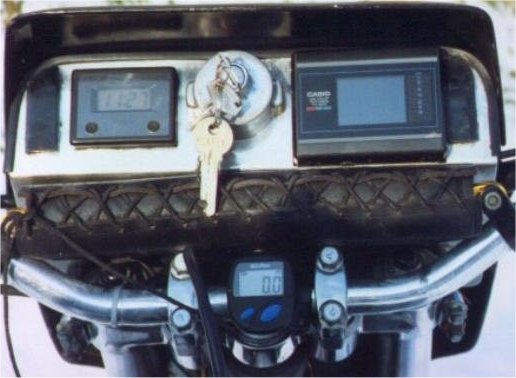
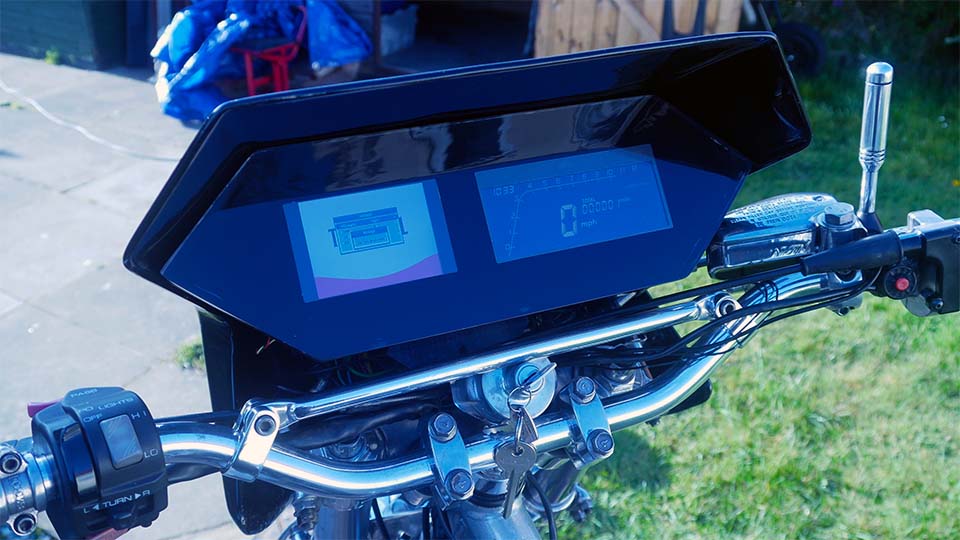
and you couldn't jump from rough to smooth or it would take longer. I couldn't afford to pay for them to be polished, but it would probably have been done in a day with an industrial buffer. I didn't have a buffing machine and beleive it or not I first started buffing parts using a kirby vacuum cleaner that I got very cheap which comes with a buffing attachment with a flexible shaft. But, the flexible shaft overheated and stopped working so I did most of the buffing using a drill or angle grinder with buffs and those both run at the wrong speed for buffing. Rear mudguard/tailpiece : I originally made the tailpiece with two pieces of stainless. One shaped under the seat and sticking out on top of the rear lens, and another underneath this part which enclosed the bulb holders, came out underneath the lens and carried on outwards as a mount for the number plate. The underneath part eventually broke off through constant bending at the top of the number plate, so I made another separate number plate mount out of thicker stainless. Later on I added a plate under the seat going down towards the front of the swinging arm. This has a very neat cut out for the rear shock swiveley thing (official Kawasaki part description) to pass through. This plate replaces the original plastic guard to stop dirt getting onto the shock. I didn't think it would need done but it looks great and really tidies up the back end. Left side panel : This was put on basically to cover up the plastic air filter cover (shown below) which never looked too good even when shined up with silicon spray on polish. There was a fair amount of work in this as each of the round holes were made by drilling small holes then using files to bring them out to the right size. Another task that would be very easy in a machine shop with a punch or milling machine. All the edges were cut by hacksaw then filed smooth and the whole thing polished stage by stage. Instrument panel : Made out of stainless and polished, to mount instruments. 2022 UPDATE I made zero changes to the stainless steel parts on the bike apart from fitting a KX ear ring that I made in the original build into a 3d printed plastic sidestand foot. That ear ring was made from the same piece of stainless as the tailpiece.
FRONT MUDGUARD I bought the front mudguard from a breakers, I haven't a clue what bike it's off. I got it chromed in the local dockyard, drilled 4 holes in it and bolted it on. 2022 UPDATE I tried getting the original mudguard powder coated silver inside, but they didn't make a great job of it and it probably would have been hard to make it look good due to pitting etc. I found out in 2022 it was off a KH400 and I got a new one for 59.95 GBP. I 3d printed mounts for it and made alloy brackets to hide the holes that I drilled in the wrong place. Covered in video number 22 in the restoration series. LIGHTS AND ELECTRICS The electrics were never great on the bike, as I didn't know anyone with experience of wiring a bike from scratch. Power : While I was in Dunfermline motorcycles getting one of my magneto coils rewound (for about the fifth time), I pointed out to Raymond (one of the famous Chiappa brothers), that the magneto backplate had a space for another coil. He then leaned over, picked up a coil that was lying on the ground next to him, tried it and it fitted! So I still don't know what bike the coil was off, but it did power the lights reasonably well, although you had to keep revving the engine at traffic lights or they would give out as much light as a candle. A separate wire coming from this coil was supposed to go to the battery to trickle charge it. I connected this to the battery, but doubt if it ever worked as it's probably supposed to have some other circuitry involved. Battery : I originally used a standard, but very small 12 volt battery, but after a wheelie or two (hundred), all the acid had leaked out and it quickly died. I then used a yuasa sealed lead acid battery, which worked great. I cant remember the model number, but if you're fitting one yourself I would basically get the biggest one that you can physically fit in what space you have. That battery would last about four hours with the lights on, but if you needed power for a long journey you had to ration its use. Like only indicating when somebody could see you or driving with no lights on deserted roads. Only joking, but I did get caught short in Blackpool. On the way back from the photo shoot for Superbike magazine I stopped off in Blackpool, parked the car and trailer then headed into Blackpool for a while. After a few wheelies along the promenade I decided to head back, but couldn't find the car. I had to head right out of town then back in to remember where I'd parked it. By the time I found it I'd been driving around in the dark with no lights for about half an hour. Front light : The original was a standard acerbis enduro model with twin plastic lights. I cut these out and fitted a headlight from a Triumph acclaim (quite old and crap british car). I then filled the gaps either side of the headlight with pieces of indicator lens that I picked up at the local car scrap yard. I managed to mount the indicator bulb holders onto the side of the headlight. The front light doesn't look too good, it could have been done much tidier and I'm not too keen on the fairing anyway. I intended making a fairing of my own design out of 10mm thick alloy, but never got round to it. Rear light: It took a fair bit of working out how to place and secure the bulb holders (which were also picked up from the local scrapyard), Also how to secure the lens. The indicators also have separate small pieces of metal to shield the light from the bulb so it doesn't light up the red tail-light lens. These had to be cut to shape and squeezed in too. The lens was made from a Vauxhall chevette (quite old and crap british car) taillight lens. Two of these originally sat horizontally either side of the cars rear number plate. The lens originally had a white or clear part for the reversing light (on the right above), so I filed down about 1mm off the front of this and glued on a thin piece of yellow lens. The whole lens, which was originally rectangular was then ground down and filed to fit the shape of the tailpiece (I still remember the smell of plastic being ground and heated by the grinder). I had to keep adding rubber mounting everywhere to stop bulbs blowing and lenses cracking with vibration. There is also a clear peice of plastic under the lens which used to light one side of the car's number plate (when it was vertical). By luck this worked perfectly to light my number plate. 2022 UPDATE Front light: I 3d printed the self designed fairing from my life long KZX design project and reinforced it with fibreglass. I first spent lots of time mounting 3 horizontal led lights but found out they won't pass a UK mot so I then got a Yasmaha TZR125 headlight. And led indicators either side. This is covered in detail in videos 15,16,17 and 20 in the restoration series. I tried fitting led bulbs to the rear light but couldn't get them flashing properly so I left it totally unchanged from the 1993 build. PAINT I did all the paintwork apart from the frame, which was resprayed by a friend. The side panels and fairing are plastic so the paint was always peeling off. I found out about special paint for spraying onto plastic, but it was very expensive even for enough to paint a bike. I've resprayed the side panels a few times and the mural is starting to peel a bit. I designed the Craig Hood logo on the tank when I was about 18 and just adapted some lines to fit the shape of the tank. I covered the tank with masking tape, drew the design with pencil, and then cut it out with a scalpel. (That isn't a blemish near the top, it's the dot from the letter i) It took ages, but I think it was worth it. The paint also fades from dark to light at certain bits, like where a line changes from the outside to the inside. It's not too noticable in the photo above, but the outside stripes are dark metallic grey and the inside stripes are medium silver. The mural (below) took about 4 days altogether, but is maybe about 10 to 12 hours work. It was copied from a photo that I got a mate to take. It wasn't easy getting a photo where the front wheel was right up, and at the same time the bike being directly in front of the camera. I got the photo blown up to the size I wanted then traced basic outlines of the bike onto frisk film (Frisk film is like sticky backed plastic that's used for masking). I then cut out individual parts with a scalpel and sprayed them with an airbrush. I used a lot of the same paint that is actually on the bike. The wheels are powder coated white and are a nightmare to keep clean as they have lots of tight spots to get into. I usually take about two or three hours to clean and polish the bike before a show or trip. 2022 UPDATE I deliberately painted the bike to match my guitar collection and my unique, self designed 3d printed drumkit. I painted the black with spray cans then cut the self designed white graphics on my Roland GX24 vinyl cutter (bought just for this project and sold after the bike was finished). I applied those graphics and sprayed clear lacquer with spray cans over that. This is covered in detail in videos 18 and 19 in the restoration series. The image above was chosen by Back street heroes magazine for their June 2022 readers lives section. Screenshot HERE I sent them quite a few of the images in this page to give them good views all round the bike. It's probably the last image I would have chosen as it's important to me for people to see the side view of the fairing. The angle of the headlight area in particular is unique and it was that fairing side profile that started me off the design of the KZX when I was a teenager. (The day before it opened, I left the bike parked at the Scottish motorcycle show with the handlebars straight for the same reason. I later found a facebook image showing someone had moved the bike and turned the handlebars. So I had to specially get there first thing in the morning before it opened to straighten the bars again). The image below shows the sketch (circled) that made me start the lifelong KZX design project and I ended up using that fairing on the KX. More details on the KZX page. SEAT The seat is just the original KX foam covered in black by a local upholsterer. I designed and cut out the grey material and got the upholsterer to stitch it on. 2022 UPDATE I cut the 500 shape on my Roland GX24 vinyl cutter (out of white instead of gray) and got an upholsterer to stitch that on. It looks the same as the old seat but it is much better quality with the shape being cut perfectly and the stitching much more accurate. TANK The tank is from a Kawasaki KLR 600 and was on the bike when I got it. It is metal and, at the time of buying the bike, plastic tanks were illegal for road use in the UK. That has since changed as I think a lot of car petrol tanks are plastic. EXHAUST The original KX exhaust is ridiculously loud for road use. I was told by Paul Chiappa (local bike mechanic) that most of the sound comes from the wide part of the expansion chamber and that exhausts on road bikes have an inner perforated skin wrapped in fibreglass. So I drilled loads of holes in the original exhaust then got a mate to weld a second skin of metal over a layer of fibreglass. This was noticeably quieter, but didn't look good, so I drilled loads of holes in the second skin and got my welding teacher to make a third skin over a second layer of fibreglass. I was doing a welding course at the time, but wasn't confident enough to try this myself. It is now a lot quieter but it weighs a ton. Another tip from Paul back then was to seal round the exhaust where it enters the barrel with silicon sealer. I did this the day before I used the bike and it made a huge difference to the noise but the silicon usually blew itself out after a few days. I only just found out in 2020 that the KX 500 is known for the alloy in the barrel wearing where the exhaust goes in, so the rubber O rings on the exhaust don't seal anymore and smoke/noise comes out there leading to power loss. I cut about 4 inches off the end of the exhaust and about 2 inches off the length of the silencer. This was just to make it look neater with the short rear tailpiece. 2022 UPDATE The exhaust was just sanded with small parts of filler re-applied and I sprayed it with a can of matt vht paint. This is covered in detail in video 17 in the restoration series. ENGINE The engine hasn't been altered in any way. I bought an identical KX500 from my brother for spares. I stripped both engines completely then rebuilt one good engine using the best parts from each. I've had the engine out of the frame a few times but mostly to repaint it. 2022 UPDATE I did take the engine completely apart, but I only added new rubber seals and gaskets and a new old stock piston ring. I sprayed it with a hammerite smooth black gloss spray can the same as in 1993. This is covered in detail in videos 13 and 14 in the restoration series. GEARING When I first tried the bike on the road with standard gearing it would lift the front wheel in top gear without much coaxing, but you'd be going along a dual carriageway at about 50mph with the engine screaming it's head off. So I then tried the smallest sprocket I could get for the rear (which was ridiculously small, the chain was just about touching the sprocket mounting bolts), this was good for motorways, but the bike would hardly wheelie at all. I settled for somewhere in-between where the bike would sit at comfortable revs at 70mph, but still wheelie. (I will add the exact gearing the next time I look at the bike) With the highest gearing I managed 115mph, but this was sitting about 2 yards behind a mates car which would obviously decrease drag loads. I reckon it will do about 100mph top as is. INSTRUMENT CONSOLE The first console I used had a digital clock from a car, a key/ignition unit from an unknown bike and a round mechanical speedo that I picked up second hand. The cable drive broke after a while so I started using a digital cycle speedo mounted on the handlebars. I then replaced the round speedo with a 2-inch LCD screen colour television (like you do). See the television chapter below. One problem with me changing the speedo to an lcd one was, when I got the bike MOT done (UK yearly roadworthy inspection), the overall mileage of the bike was less one year later. And that mileage has to be written on the MOT document. I also added "idiot lights" either side of the panel with small bulbs that light up when the indicators, high beam e.t.c. are on. These were hand cut to shape from an audi car found in the scrap yard. When I first finished the console I thought it looked ok, but it could be loads better. I wanted it to look futuristic or high tech. I thought about using the console from a Vauxhall astra GTE (fairly old and not crap british car) which is pure black till you switch it on, then it all lights up in red led. It looks great, and I could have got one for 10 GBP but it would have been very hard to wire up properly. I'm sure it could be done though, even fitting an electronic rev counter, low oil level sensor e.t.c. to the engine. This was in the 90s, but even small bikes nowadays (2020) have lcd digital displays. TELEVISION The television was partly for the futuristic look I mentioned before, partly for originality, but mostly for a laugh. When I first fitted it, I went up to Paul Chiappa (mechanic) at Dunfermline motorcycles and asked him if he could have a look at my bike. I told him I wasn't getting very good reception. He said, "What are you talking about reception, you better get Raymond (his brother) to look at it he deals with electronic stuff". I said no, just come and have a quick look. He looked at it and said "%$&#%??;*#@ I've seen it all now", then called everyone out of the shop to have a look. They usually get closer and closer and then move back totally shocked and shout at their mates "It's got a %$&#%??;*#@ colour television on it!". A couple of times I caught idiots trying to pull the TV out of it's mounting. I think this, and vibration from the bike, eventually caused the TV to stop working. It is now completely empty, and has a small photograph of the bike inside the screen I also got stopped by a police motorcyclist once who didn't like me going to the front of the queue at traffic lights. I had very recently tried to contact this same policeman as a magazine wanted to do an article on putting motocrossers on the road so I wanted as much info as possible about the law regarding that. I waited till he had finished giving me a ticking off then said "Are you PC (can't remember his name now but he was the top police motorcyclist at the time. Maybe PC Robertson)? He said yes and I said "I've been trying to get in touch with you". He said "Oh is that you?" then he completely changed his attitude and we had a good talk. I said "What's the law on that then?" pointing to my TV. He went over and was amazed when he saw what it was. He also said he had seen it all now and was laughing about it. I saw him a few times after that when I was driving around town and he always gave me a big wave when he saw me. There's a good chance he mentioned to a few other people that he once stopped a motorbike with a colour TV on it. 2022 UPDATE I bought an identical Casio TV500 to the one fitted in the first rebuild on ebay. It was immaculate. The old one stopped working a long time ago. Because this is an analogue TV, it no longer receives TV stations in UK so I had to buy a freeview receiver. I also needed a scart adapter to join the TV to the freeview receiver and all of these items were modelled in 3d cad so I could fit them into the fairing console box before I 3d printed it. I also fitted a digital speedo which is for motorcycles unlike the previous bicycle speedos and I cut a piece of clear acrylic as the console screen. This is covered in detail in videos 17, 19, 20, 21 and 22 in the restoration series. 2022 FURTHER UPDATE I put a lot of time into fitting the TV500 but, after noticing that it is almost impossible to see outside in daylight, I changed it for a 3.5 inch reversing monitor. This is much easier to see in daylight and even the smallest text is readable, so I can now use the freeview menus which wasn't possible on the TV. The reversing monitor has no speaker but I had another Casio TV500 with a faulty screen. I have it mounted in the instrument console behind the monitor and I have the freeview receiver connected to it, but I'm only using the TV speaker to play the sound from the freeview receiver. A couple of disadvantages of not using the TV are : 1. I now can't say the bike has an onboard TV and can only say it has a freeview receiver. 2. It was possible to see that it had a TV fitted even when it was switched off as the TV500 has that written on the front. The monitor fitting is covered in video 22 in the restoration series. (The freeview aerial is visible on the right in the image below) Only in May 2022, a couple of months after "finishing" the bike (will it ever be finished?) I managed to get TV reception on the freeview receiver. I fitted a 50cm aerial extension lead coming out of the instrument console from the freeview receiver. This allows me to plug in an external aerial. I bought an identical aerial to the one on the handlebars and tried moving this around. While holding it above my head, just briefly, I got a 100 percent quality signal. (Before this I always had zero percent quality but between 50 and 95 percent strength). I did an automatic search for stations and it found loads of TV and radio stations and I managed to watch one station just for a minute or so then it lost the signal. I'm not too fussy about the TV working as I can play videos on a usb stick. I will maybe work on improvements through time, but it might just come down to what area I'm in for signal quality. It's a cheap aerial and, being omnidirectional is not the correct type recommended for reception, but it looks good polished up on the bike and serves its purpose of being a silly thing to have on a motorbike. In July 2022 I managed to get a very good signal at the RNLI custom bike show at South Queensferry. I knew before going there was a freeview receiver across the river Forth about 9 miles away. I managed to watch the olympics and a Peter Sellers film. WHAT'S IT LIKE TO DRIVE? It's absolutely great fun to drive. It just begs for you to wheelie it at every opportunity (see wheelie issues further down the page). I never felt too confident going round corners at speed with it, but this was mostly because I had fitted the wheels myself with no prior knowledge of wheel fitting. During a rally I took the bike to at Aberfoyle, I went for a drive heading north. It was a hot sunny day and that road has some amazing hairpin bends. The road surface was also like a racetrack. I felt confident leaning it over that day and the bike was exploding out of the corners. WHEELIE ISSUES I used to wheelie the bike everywhere, I used to pray for a red light at traffic lights so I could wheelie away from them. It was inevitable that I would get caught sometime. I was stopped doing a huge wheelie along Princes street in the centre of Edinburgh on a hot sunny Saturday (I was on the opposite side of the road from the shops and in the outside lane so wasn't near any people). It was proper traffic cops in a BMW that stopped me. They just gave me a warning, admired the bike for a while then let me go. (They had seen my bike parked at knockhill racing circuit before and gave me compliments etc.) I got stopped another time on a dry road with good visibility and no traffic or pedestrians about. This time it was two young cops in a police van. One of the cops was going absolutely crazy at me. So there was no traffic or pedestrians around, but the police lied and, when I got my court summons it mentioned there was 3 cars coming in the opposite direction. I was charged with dangerous driving and, after a year of trying unsuccessfully to find a solicitor that would help me with the case, I got banned for a year, a 200 GBP fine and ordered to resit my test. In Scotland, at that time, if you were banned for dangerous driving, you had to resit every test that you had passed. So I had to resit my car test, but since then I have not resat my bike test because it costs a fortune. It cost me 10.30 GBP when I passed my test in 1980, and when my year ban ran out in 1995 it had went up to I think 170 GBP or more. I phoned the DVLA in 2024 and was told I can do category A direct access. The cost for all of the tests I have to take (written and on the bike) is between 243.50 and 273.50 GBP. So that is tests only without any lessons or bike hire etc. How can the price of something go up by that much? This is the newspaper cutting from my court case. Wheelying the length of the Glen bridge was an early target for me so I've got written proof of that with police as witnesses. I could wheelie it right up to top gear by not using the clutch and kicking it into gear while the throttle was closed. But, as much as I tried, I could never get used to using the back brake, so all of my wheelies were just balanced power wheelies. After getting stopped by the police another time for practising wheelies on a very quiet road in the countryside, those two policemen suggested I should maybe ask at the local race circuit if I could wheelie there. Again both of them had already seen my bike parked at the race circuit maybe a week earlier and said they had been admiring it then. I went to the race circuit (Knockhill) and the circuit owner asked me to do some wheelies then suggested I could do wheelies for the crowd inbetween races. So, for a short while I was given the whole track to myself first thing in the morning for about an hour to practise. I spent all of this time trying very hard to get the bike past the balance point so I could use the back brake to bring the front wheel forwards again. But each time I got just past the balance point I would freeze, thinking I was going to die (going around 70 or 80mph), and I would just brace myself for a crash, instead of touching the brake. I know using the back brake can save you even if you go very far past the balance point. And me simply coming off the throttle was enough to bring me back a few times from being slightly over the balance point, even though two stroke engines have very little engine braking. A side effect of me trying to get past the balance point meant that I was now wheelying much further than I had before. My longest wheelie ever would have been during that time at Knockhill where I wheelied from the apex of the hairpin, up over the top of the hill and landed just past the footbridge which works out around 450 metres (just over quarter of a mile). Because the long uphill main straight has a steep slope from left to right, I had to start on the hairpin apex then aim for the far left edge of the track. I would then gradually drift over to the far right of the track while hanging off the left of the bike to compensate. A few times I went off the right side of the track onto the grass at around 70mph which was a bit scary. It's a motocrosser, but the road tyres are not great on grass. Going over the top of the hill would act as a free boost. I could let off the power a fair bit and almost coast downhill. I always feel safer wheelying uphill simply because the front wheel is nearer the ground, but I eventually started getting very long wheelies when returning back down the hill to the hairpin. I stopped practicing wheelies at Knockhill because I couldn't afford it, but I'm glad I stopped as I might have eventually crashed my bike and it could have happened in front of a large crowd. A lot of people can do much longer wheelies using the back brake and stunt riders even back then were doing much more like stoppies etc. which I have never done before. Loads of motorbike magazines have people wheelying bikes on the cover, and it's seen by lots of us as a bit of fun, but I suffered badly when I got caught. I would only recommend it on private land. FAX MACHINE After upgrading my casio 2 inch television (fitted in the 90s) to a freeview receiver with remote and usb video playing capability, I thought "What is more ridiculous than freeview on a motocrosser?" I came up with the fax machine idea before August 2021 as I mention it as an option in my restoration video number 17. But it's unfortunate that while fitting it around May 2023 I found out that in January 2023, the government stopped all fax service in the UK, but I did know while learning about the Possio fax machines I was looking at, that they are capable of receiving and printing text messages. I spent a lot of time trying to get a Possio greta working which is their newest model (and it's red), but decided on the older Possio PM70 as it is black and, though it's not as advanced with no lcd screen, it still prints text messages. As in the very funny "Friday night dinner" comedy series, in an episode where the kids turn up on Friday for dinner, the Dad who's character is an idiot, excitedly opens the door and says "I've bought a fax machine!". One of the kids first says "Why?" then points out "You don't even know anyone else who has a fax machine". So for the same reason, I didn't need the scanner part of the machine so I started off with one of the smallest fax machines in the world. I then removed the scanner part including it's motor and roller and gears etc. making the machine smaller, but my first attempt at fitting made it even smaller still by trying to fit only the insides of the machine into my airbox. You can see that in the following pic, but this would mean fitting the keypad elsewhere on the bike and running a cable to that and would also mean cutting some of the air filter away and the paper would be hard to feed out the top of the airbox so I decided against that. After a lot of figuring out and owning 3 fax machines I eventually ended up with it working fine, but also looking good fitted on the bike with an aluminium bar I made and polished which helps to hold it in place but also covers the cut that I made using an angle grinder where I cut the keypad part off and rotated it 180 degrees so the buttons were more upright when on the bike. But because the rest of the machine is the other way round, when it prints and the paper feeds out, the writing is more upside down. But it's now a regular funny thing in my youtube videos seeing people bending over to read my message that I have on it at shows. This is what it has printed on it at shows. So on the bike it fits in with the lines of the stainless steel air filter cover and quite a few people have thought it's an electric bike after seeing the fax machine buttons. I also think of that as a compliment because this is an 1985 bike that I have created with little money and lots of hard work and they must think it's a fairly recent, mass produced bike. I fitted the fax machine just days before the London bike shed show and it got some great reactions there, even before I had got into the building. They can be seen in part 1 of my 5 bike shed show videos. The beginning of that same video also covers the fitting of the fax machine. (Links to my restoration video playlist and details of what each video covers below). WHERE HAS IT BEEN AND WHERE IS IT NOW? (This chapter was written before 2019) The photo above was taken in August 2008, the alloy parts are pretty white and dull, and some of the steel parts that I polished (rear spring and kick start) are rusty. Since being banned I have only started it up once. It has been sitting since around 1995 either in my spare room or in a garage covered with junk. I haven't any immediate plans to get it back on the road but if I decided to, I would give it a complete going over again. It is looking slightly tatty in some areas. I have no intentions of ever selling it. It always gets loads of attention and the only person who deserves that attention is me. (I didn't build this to get attention. It was just a project I got massively into and it turned out to be a bike that attracts lots of attention. What I mean in my previous comment is, if somebody bought it, they would get masses of attention with zero effort or hard work). Wherever I park the bike it attracts a crowd. I was at a road race meeting at Knockhill where there was also a motocross race going on. I drove over to check out the motocross racing and my bike had a crowd round it before I had even stopped. I was surrounded by people walking along beside me till I found a place to park. At another Knockhill road race event I had parked my bike near the pits for a while then moved it down near the hairpin. I heard a woman say "Look there's another one of those Craig Hood bikes". That confirms a comment a few people have made saying it looks like the bike was manufactured like that instead of being built in a kitchen. (This line added in 2022 : The 2022 build looks even more like a complete manufactured bike. The announcer at the Yorkshire classic and performance show (although he didn't know much about bikes), after I said it was a 1985, asked "Is that what it looked like when it was new?". Others thought it was a brand new electric bike.) Another good memory from the 90s was when I was at a bike rally in the North of England. Maybe on the Sunday there was an organised ride out where loads of bikes all went for a drive in a huge line. There was a wee boy with his Mum at the side of the road waving at all of the bikes. As I drove past I was thinking "Wait for it". He pointed at my bike and shouted "WOW!! LOOK AT THAT ONE!!". 2019 TO 2022 RESTORATION VIDEO SERIES THEN BIKE SHOW VIDEOS I got the urge after 23 years to restore the bike back to good condition. It has been stored in garages and all of the steel parts have rusted, all of the alloy has oxidised and it generally looks in a bad state. So it needs completely stripped down to the frame and everything done again ie. repainted, all of the metal polished and some parts repaired or replaced. I started recording this process on video 22/11/2019 and I will add updates here. This is different from the usual "restoration" projects you see on tv where they seem to have an infinite supply of money. They send the engine to acme tuners for a five grand tune up and acme painters for a five grand paint job and they replace almost every part with brand new, extremely expensive parts. That's not a restoration, it's a replacement. They might as well start with no bike and build a new bike out of brand new spare parts. I will do all of this myself apart from powder coating (frame) and chrome (3 parts) and I will do it as cheaply as possible while still aiming to have a very nice end result. That's how I customised the bike the first time, with lots of work and very little money. Just like my 12 string painting video, the restoration videos by choice use captions or subtitles which mention all of the important information. These captions can be translated to different languages which would be much harder using narration and, it's possible to edit the captions after the video is uploaded. Also by choice there is deliberately no music in the videos. As a musician with some performing/mixing/production experience, I personally can't stand choosing to watch a video about any subject other than music and being forced to listen to the most annoying music ever (for 2 seconds till I mute it). If you add music to a (non music related) video, you will be pleasing a handful of viewers who just happen to have a similar musical taste as you and you will be annoying the other 95% who hate that kind of music. So parts of my videos are silent and have "No sound in this part" displayed. This is the playlist which will play all the videos in order and will be updated as I add more videos. Part 1 Will it run after 23 years. "Will it run?", showing the condition of the bike, washing and dismantling it to get parts clean and ready to work on. Part 2 Caliper polishing. Polishing the front brake caliper and learning how to use the polishing/sanding products I have in an efficient way. Part 3 Swingarm polishing. Polishing the swingarm while still learning how to use the polishing/sanding products I have in an efficient way. Part 4 Front brake polishing. Removing paint from and polishing the front brake caliper and master cylinder. Part 5 Polishing various parts. Polishing the front forks, all of the rear brake parts, front clutch lever and throttle body. Part 6 Wheel polish 1 of 2. Video one of two removing paint from and polishing the wheels. Part 7 Wheel polish 2 of 2. Video two of two polishing the wheels. Part 8 Polishing more alloy. Polishing more alloy parts, making a spacer for the front wheel bearings and dremel repair. Part 9 Tyre whitewall painting. Painting pinstripe whitewalls on both tyres. Part 10 Radiators and bolts. Repairing and painting dented and damaged radiators and polishing nuts and bolts with an ultrasonic cleaner and vibratory tumbler. Part 11 Last of the polishing. Removing anodising and polishing the front disk. Polishing the foot rests and triple clamp and, polishing the chrome and stainless steel parts. Part 12 Chassis rebuild. Rebuilding all of the polished metal parts, wheels, suspension, mudguards etc., on to the powder coated frame. Part 13 Engine teardown. Completely dismantling the engine including the cylinder head and barrel removed and the bottom of the engine taken apart ie. clutch, gearbox etc. Part 14 Engine rebuild. Rebuilding the engine with a new piston ring, new main bearings, rubber seals and gasket set and taking the bike for a test drive. Part 15 3d printed fairing part 1 of 2. Designing the fairing in cad, 3d printing, joining parts with a soldering iron, cutting the clear acrylic for the headlight area. Part 16 3d printed fairing part 2 of 2. Applying fibreglass to the fairing and side panels. Part 17 various jobs. Petrol tap repair, petrol tank cleaning with vinegar, exhaust and engine sanding and painting, carb gasket making and starting the bike, graphics design for vinyl cutting, instrument console design and fibreglass, TV upgrade and considered dashboard options including fitting a fax machine, headlight shroud, headlight adjusters and front indicators. Part 18 Spray painting part 1. Spraying grey primer with spray cans, using body filler and knifing putty then sanding, spraying black gloss with spray cans, removing reacted paint, sanding black paint in preparation for applying graphics . Part 19 Spray painting part 2. Making a perspex top for the console, re-painting the tyre whitewalls, checking the lighting wiring, designing vinyl for the console display, cutting and applying vinyl graphics, spraying clear lacquer over the graphics with spray cans, losing a circlip, taking the seat cover off. Part 20 Final build part 1. Fitting new seals and loosening seized adjuster rings on the rear shock, repolishing all the alloy, cutting the seat faux leather with the vinyl cutter, headlight bracket adjustments, finishing the tail light, mounting the ignition switch, polishing the brake lever, making a bracket for the freeview aerial, sticking on the console acrylic vinyl, polishing the TV screen, removing the tyrewall paint and glueing on rubber pinstripes. Part 21 Final build part 2. Cutting and stitching leather handgrips, redoing all the wiring, 3d printing a headlight mount area backplate, cutting and applying vinyl graphics for the number plate, final sanding and polishing of the paintwork, final building and mounting of the instrument console, and fitting the newly covered seat. Part 22 Final build part 3. Cutting stickers for the engine, fitting a new mudguard and kickstart pedal, 3d printing a sidestand foot, finishing the paint, repairing a paint mistake, pushing it onto the towbar rack, fitting a monitor for the freeview receiver, repairing a crack in the exhaust, fitting a charging/lighting coil, taking the bike to shows, photo in Back street heroes magazine and blooper reel. THE FOLLOWING VIDEOS ARE ALL TAKING THE BIKE TO SHOWS. 2022 SHOWS. The Scottish motorcycle show at Ingleston Scotland in March, The classic and performance show at Ripley castle England in May, Ayrshire motor show at Ayr Scotland in May, recutting and refitting the console vinyl, sanding and smoothing ripplies in the fairing, Tayside classic motor show at Errol Scotland in June and The Sir Jackie Stewart classic show at Thirlestane caste Scotland in June. Todmorden game and country fair, Todmorden England in July and The classic and performace show, Leighton hall, Carnforth, England in July. The Scottish festival of motoring, Ingleston Scotland in July and a dyno run at Livingston, Scotland in July. The Bangers n flash show, Craigtoun park, St. Andrews, Scotland in July. Fitting corsa van springs and levelling the rack. The RNLI custom bike show, South queensferry, Scotland organised by the bikers cove cafe in July. The Horsepower and handlebars show, Inverkeithing, Scotland in August. The Cleanfest show part 1 of 2, Ingleston, Scotland in September. The Cleanfest show part 2 of 2, Ingleston, Scotland in September. The Kickback life behind bars show part 1 of 2, Gloucester prison, England in September. The Kickback life behind bars show part 2 of 2, Gloucester prison, England in September. 2023 SHOWS. The Scottish motorcycle show at Ingleston Scotland in March. Spraying the exhaust, getting the frame powder coated black and the 2023 Scottish motocycle show. The Kickback custom motorcycle show Manchester England in April Pt 1 of 3 covers the Friday before the show and Saturday morning. The Kickback custom motorcycle show Manchester England in April Pt 2 of 3 covers Saturday afternoon. The Kickback custom motorcycle show Manchester England in April Pt 3 of 3 covers Sunday. The Stirling and district classic car show Scotland in May. The Bike shed show London England in May Pt 1 of 5 covers fitting the fax machine and Friday at the show. The Bike shed show London England in May Pt 2 of 5 covers Saturday morning. The Bike shed show London England in May Pt 3 of 5 covers Saturday afternoon. The Bike shed show London England in May Pt 4 of 5 covers Sunday morning. The Bike shed show London England in May Pt 5 of 5 covers Sunday afternoon. The Bo'ness car show Bo'ness, Scotland in June Pt 1 of 2 covers the morning. The Bo'ness car show Bo'ness, Scotland in June Pt 2 of 2 covers the afternoon. The BVAC classic show Thirlestane Castle, Berwickshire, Scotland in June Pt 1 of 2 covers fitting a polished alloy bar on the fax machine, 2 small speakers into the instrument console, fitting an auxiliary fuel tank and Sunday morning at the show. The BVAC classic show Thirlestane Castle, Berwickshire, Scotland in June Pt 2 of 2 covers Sunday afternoon. The Kirkcaldy motorcycle show, Kirkcaldy ice rink, Fife, Scotland in July. The Scottish festival of motoring, Ingleston, Scotland in July Pt 1 of 2 covers repairing cuts in the seat cover with superglue, Saturday afternoon and Sunday morning at the show. The Scottish festival of motoring, Ingleston, Scotland in July Pt 2 of 2 covers Sunday afternoon and driving the bike after the show. The Kingdom classic auto show Lathalmond bus museum, near Dunfermline, Fife Scotland in July. This covers the whole show and driving the bike after the show. Northumberland classic and performance show, Corbridge, England in August. Part 1 of 2 covers Sunday morning and drone footage during the show. Northumberland classic and performance show, Corbridge, England in August. Part 2 of 2 covers Sunday afternoon, the bike starting then stopping and drone footage at the end of the show. The Horsepower and handlebars show, Inverkeithing, Scotland in August. Part 1 of 2 covers Sunday morning and drone footage during the show. The Horsepower and handlebars show, Inverkeithing, Scotland in August. Part 2 of 2 covers Sunday afternoon and drone footage at the end of the show. The Scottish performance show Kincardine, Scotland in September. Part 1 of 2 covers my new T shirt and Sunday morning. The Scottish performance show Kincardine, Scotland in September. Part 2 of 2 covers Sunday afternoon, trying to start the bike and breaking the kickstart boss. The Cleanfest show, Ingleston, Scotland in September. Part 1 of 2 covers the bike not starting in the past 3 weeks and finding the reason why, breaking and repairing the kickstart boss, flywheel lapping and sidestand end cover repair. Dropping the bike off the Saturday before the show and driving it and Sunday morning. The Cleanfest show Ingleston, Scotland in September. Part 2 of 2 covers Sunday and driving the bike before leaving. 2024 SHOWS. Winter maintenance 2024 PT 1 of 2 covers fitting new vinyl to the instrument console, repairing a crack in the fairing, straightening a bend in the fairing top, touching up the side panel and petrol tank paintwork, petrol tank rust removal and fitting a different kickstart pedal. Winter maintenance 2024 PT 2 of 2 covers itting a heat shield to the fax machine and polishing all the alloy. Malvern Kickback custom and classic show, Malvern, England in April.Saturday Part 1 of 2 covers Saturday morning. Malvern Kickback custom and classic show, Malvern, England in April.Saturday Part 2 of 2 covers Saturday afternoon. Malvern Kickback custom and classic show, Malvern, England in April. Part 1 of 2 covers Sunday morning. Malvern Kickback custom and classic show, Malvern, England in April. Part 2 of 2 covers Sunday afternoon, driving the bike, drone footage and rack issues. Anglesey Kickback show, Anglesey, Wales in May. Part 1 of 2 covers finding out why the bike wouldn't start, driving the bike and Saturday morning in the show. Anglesey Kickback show, Anglesey, Wales in May. Part 2 of 2 covers driving a short distance, Saturday afternoon in the show and the drive back to the campsite. Cheshire classic car and motorcycle show, Cheshire, England in May. Part 1 of 2 covers Sunday morning in the show. Cheshire classic car and motorcycle show, Cheshire, England in May. Part 2 of 2 covers Sunday afternoon at the show, drone footage, driving the bike and driving back to the campsite. Yorkshire classic and performance show, Ripley castle, Yorkshire, England in May. Part 1 of 2 covers driving to the show and Monday morning at the show. Yorkshire classic and performance show, Ripley castle, Yorkshire, England in May. Part 2 of 2 covers Monday afternoon at the show, drone footage, driving the bike to the car, showing the towing mirrors and driving to the next campsite. BVAC classic show Thirlestane castle, Lauder, Scotland in June. Part 1 of 2 covers driving to the show, driving the bike from the car to the filming area and Sunday morning at the show. BVAC classic show Thirlestane castle, Lauder, Scotland in June. Part 2 of 2 covers Sunday afternoon at the show, driving the bike from the filming area to the car and driving out of the show. Lake district classic and performance show, Hutton in the forest, Penrith, England in June. Part 1 of 2 covers adding led lights to the trailer, fitting reed valve petals, fitting a new inline fuel filter, driving to the show and Sunday morning at the show. Lake district classic and performance show, Hutton in the forest, Penrith, England in June. Part 2 of 2 covers drone footage and Sunday afternoon at the show. The Kirkcaldy motorcycle show, Kirkcaldy ice rink, Fife, Scotland in July. Part 1 of 2 covers repairing paint damage, driving to the show, photos taken for the mural, dictaphone details and Sunday morning. The Kirkcaldy motorcycle show, Kirkcaldy ice rink, Fife, Scotland in July. Part 2 of 2 covers Sunday afternoon. The Scottish festival of motoring, Ingleston, Scotland in July Pt 1 of 2 covers Saturday afternoon, driving the bike and Sunday morning at the show. The Scottish festival of motoring, Ingleston, Scotland in July Pt 2 of 2 covers Sunday afternoon and driving the bike after the show. The Kingdom classic auto show Lathalmond bus museum, near Dunfermline, Fife Scotland in July. Part 1 of 2 covers Sunday morning. The Kingdom classic auto show Lathalmond bus museum, near Dunfermline, Fife Scotland in July. Part 2 of 2 covers Sunday afternoon and drone footage of driving the bike. The Kirkliston classic car show, Kirkliston, West lothian, Scotland in August. Part 1 of 2 covers Sunday morning at the show. The Kirkliston classic car show, Kirkliston, West lothian, Scotland in August. Part 2 of 2 covers Sunday afternoon at the show. The Northumberland classic and performance show, Corbridge, Northumberland, England in August. Part 1 of 2 covers driving to the show and Sunday morning at the show. The Northumberland classic and performance show, Corbridge, Northumberland, England in August. Part 2 of 2 covers Sunday afternoon at the show and drone footage of driving the bike. YOUTUBE CHANNEL PROMOTION In mid July 2021, after having 14 videos uploaded to youtube for a year and a half, I had a grand total of 8 subscribers and my videos got not far off zero views. I was hoping I would have thousands of subscribers who eagerly wait for the next episode like Bad obsession motorsport. Uploading that way would maximise the chances of each video getting lots of views as not many people finding my channel will watch all the videos which would take over 10 hours. Also, the videos are intended to be watched in order starting from part 1. Watching later videos first is a big spoiler as you might see the results of loads of work carried out in previous videos. To try and get more subscribers, for about 2 weeks, I added a post with photos and a video playlist link to various motorbike and restoration related facebook and reddit pages. It took up a lot of my time responding to comments and keeping an eye on all of the posts and the result was about 10 new subscribers. I then tried out google ads for a few days. My ad video got 545 views in 3 days but I only gained another 10 subscribers working out at 1.25 GBP per subscriber. I don't want to constantly keep adding new posts on social media, and can't afford to keep paying for google ads so I have resigned to knowing my videos will carry on getting almost zero views. I'm a perfectionist so I put masses of time into my video editing and the 4K quality is excellent from my cameras. I have a 49 inch 4K monitor and the videos look really good on that. I find so many terrible quality videos on youtube that get thousands of views and subscribers, but I just have to think of the video series as a project alongside the bike project. In August 2022 I had 27 videos uploaded, only 29 subscribers and carried on getting almost zero views. In April 2023 I had 36 videos uploaded, only 33 subscribers and carried on getting almost zero views. In October 2024 I now have 82 videos uploaded, only 51 subscribers and carry on getting almost zero views.
Click on the donate button to give Craig Hood some money for no reason at all.


I like watching people's reaction at bike shows. Most people have a look at the speedo on a bike to get an idea of top speed.
For loads of photos of the latest build go to the "New KX gallery" in the "Motorbikes" menu.
For more photos of the original build check out :


